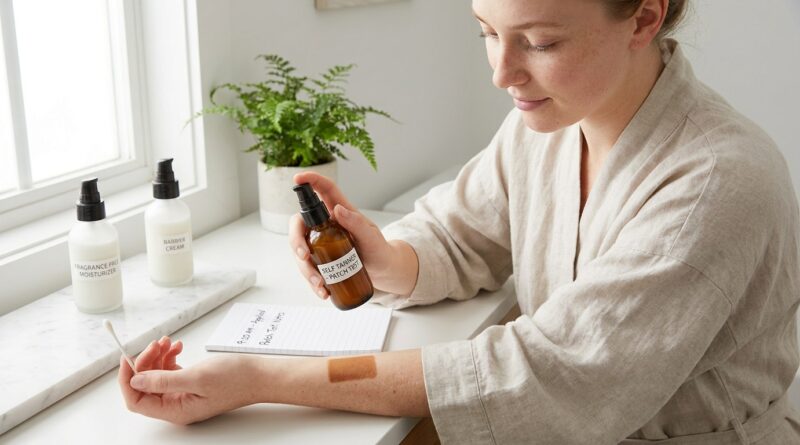
New ‘Patch-Test Glow’ Rule: How To Safely Test Self Tanner On Sensitive Skin Before You Commit Head‑To‑Toe
Nothing ruins the promise of a nice glow faster than a red, itchy rash two hours later. That is happening to a lot of people right now, especially with viral self tanners that are marketed as “clean,” “natural,” or “good for sensitive skin.” The tricky part is that the problem is not always DHA, the ingredient that creates the tan. Fragrance, essential oils, preservatives, plant extracts, and even aloe-based formulas can set reactive skin off. If you have ever stood in your bathroom wondering whether to risk a full-body application or stay pale, you are not being dramatic. You are being sensible. The good news is that learning how to patch test self tanner for sensitive skin is simple, cheap, and far less stressful than dealing with hives on your arms, chest, and legs. A good patch test will not guarantee perfection, but it can seriously lower your odds of a bad surprise.
⚡ In a Hurry? Key Takeaways
- To patch test self tanner safely, apply a small amount to one discreet area, wait 24 to 48 hours, and check for itching, burning, bumps, or rash before using it all over.
- Test on more than one spot if your skin is very reactive, especially a hidden body area and a place with thinner skin like the inner arm.
- “Hypoallergenic” and “DHA free” do not guarantee safety. Fragrance blends, botanicals, and preservatives can still cause reactions.
Why so many people are reacting to self tanners
Self tanner is still much safer than baking in the sun or using tanning beds. That part has not changed. What has changed is how crowded the market is with heavily scented mousses, tanning drops mixed with skincare, and formulas packed with trendy plant ingredients.
That sounds nice on the label. Sensitive skin does not always agree.
A reaction can come from several places. DHA can irritate some people, but so can added fragrance, limonene, linalool, eucalyptus, citrus oils, preservatives, or certain botanical extracts. Even products sold as “clean” can cause trouble if your skin barrier is already stressed.
If your skin often stings with new products, you may also want to read New ‘Microbiome-Safe Tan’ Rule: How To Keep Your Skin Flora Happy When You Fake A Glow, because a cranky skin barrier and an upset skin microbiome can make tanning products feel harsher than they should.
How to patch test self tanner for sensitive skin
This is the method that makes the most sense for most people. It is not fancy. It just works better than guessing.
Step 1: Start with clean, calm skin
Do not test on freshly shaved, exfoliated, sunburned, or already irritated skin. That can give you a false alarm, or worse, make a mild product feel brutal.
Wash the area with a gentle cleanser if needed, then let it dry fully. Skip acids, retinoids, scrubs, and fragranced lotion on that spot for a day before testing.
Step 2: Pick the right test area
The best patch test spots are small, hidden, and easy to monitor. Good options include:
- Inner forearm
- Inside of the elbow
- Behind the knee
- Along the jawline if the product will go on your face
- Side of the torso or upper hip for a body test
If your skin is very sensitive, do two tests. One on thinner skin like the inner arm, and one on a body area closer to where you actually plan to use the tanner.
Step 3: Apply a small amount exactly as directed
Use a pea-sized amount, or one small pump if it is a mousse. Spread it over a patch about the size of a coin. Do not dilute it unless the product instructions specifically say to mix it with moisturizer.
If you are testing facial tanning drops, test them in the same way you plan to use them. If you normally mix 3 drops into moisturizer, patch test that mixture, not the drops straight from the bottle.
Step 4: Leave it on for the full development time
Do not wash it off early just because it feels fine at first. Some irritation shows up later, especially with self tanners that sit on the skin for several hours.
Follow the product directions. If it is an express tanner, rinse based on the recommended window. If it is an overnight lotion, keep it on as intended.
Step 5: Wait 24 to 48 hours
This part matters. A lot of people patch test for 20 minutes, see no redness, and then go head-to-toe. That is not enough.
Check the area at these points if possible:
- Right after application
- At rinse-off time
- 12 hours later
- 24 hours later
- 48 hours later if you are very reactive
Watch for itching, heat, swelling, burning, tiny bumps, dry rash, welts, or unusual tenderness.
What counts as a failed patch test
A little color change from the tan itself is normal. These signs are not:
- Stinging that lasts more than a minute or two
- Persistent itching
- Raised bumps or hives
- Redness that spreads outside the test area
- Dry, scaly irritation
- Any swelling
If any of those happen, wash the area gently with lukewarm water and a mild cleanser. Do not try the product on a larger area “just to see.” Your skin has already answered.
What if the patch test passes?
Good news, but still do not cannonball into a full-body application if your skin is famously unpredictable.
Do a mini wear test next
Apply the tanner to a slightly larger hidden section, like part of your upper thigh or side of your stomach. Wear it through a normal day or overnight. That helps catch problems from sweat, friction, or delayed irritation.
Then do a partial body test
Before going all in, try one lower leg or one arm. This sounds a little extra, but it is smart if you have had bad reactions before. It is much easier to calm one irritated limb than your whole body.
Ingredients that often cause trouble
If you have reacted to self tanners before, compare labels. You may spot a pattern.
Fragrance
This is a big one. “Parfum” or “fragrance” can mean a mix of many ingredients. It is a common trigger for sensitive skin.
Essential oils and botanical extracts
Tea tree, citrus, peppermint, lavender, eucalyptus, and other plant-based ingredients sound gentle. They are not always gentle in practice.
Preservatives
Some formulas use preservatives that can bother reactive skin, especially around eczema-prone areas.
DHA and tanning actives
DHA is not automatically the villain, but yes, some people do react to it. Others react more to erythrulose or to the whole formula mix rather than the tanning active alone.
How to lower your odds of irritation before application
A patch test is step one. A few other habits help too.
Keep your skin barrier boring and happy
For a day or two before tanning, go easy on exfoliating acids, retinoids, scrubs, and strong acne treatments on the areas you plan to tan.
Skip shaving right before
Freshly shaved skin can sting more. If possible, shave at least 12 to 24 hours before.
Do not apply over active eczema or broken skin
Wait until flare-ups calm down. Tanner on inflamed skin is asking for trouble.
Use a simple moisturizer on dry zones
Hands, elbows, knees, and ankles soak up more product. A plain, fragrance-free moisturizer can help create a more even result and reduce irritation from over-absorption.
When to stop trying DIY fixes and call a professional
Some irritation is mild and fades. Some needs medical advice.
Get help right away if you have:
- Swelling of the face or lips
- Trouble breathing
- Widespread hives
- Severe burning or blistering
See a dermatologist or healthcare professional if you keep reacting to multiple self tanners and cannot figure out why. Patch testing in a medical setting can sometimes identify fragrance or preservative allergies more clearly than home guesswork.
Shopping tips if you have sensitive skin
You do not need to panic-buy only products labeled “DHA free.” That can help some people, but it is not the full story.
Look for:
- Fragrance-free or very low-fragrance formulas
- Shorter ingredient lists
- Fewer essential oils and plant extras
- Products made for face or sensitive skin if you are using them on delicate areas
- Clear instructions for development time and rinse-off
Be extra cautious with viral products that promise skincare plus bronzing plus shimmer plus scent. The more bells and whistles, the more chances there are for your skin to complain.
At a Glance: Comparison
| Feature/Aspect | Details | Verdict |
|---|---|---|
| Basic patch test | Small amount on inner arm or hidden area, then wait 24 to 48 hours | Best first step for everyone with sensitive skin |
| “Hypoallergenic” or “clean” label | May still include fragrance, botanicals, or preservatives that trigger irritation | Helpful clue, not a safety guarantee |
| Full-body application without testing | Fastest route to a glow, but also the fastest route to a full-body reaction if the formula is wrong for you | Not worth the risk if your skin is reactive |
Conclusion
If you have been searching for how to patch test self tanner for sensitive skin, the short answer is this: test small, wait longer than you think, and do not assume the problem is only DHA. A lot of shoppers are hunting for “DHA free” or “hypoallergenic” formulas after bad reactions, but the real trigger can just as easily be fragrance blends, botanical extracts, or a so-called natural base. A calm patch-test routine helps you avoid rashes, wasted money, and those late-night spirals where you are comparing ingredient lists at 12:30 a.m. Sunless tanning is still the safer choice compared with UV. You just want to make sure your glow shows up, not a skin meltdown.